Python-Assignment
Building Driver Drowsiness Detection System
Driver Drowsiness Detection with OpenCV & Dlib
In this project, we are going to build a driver drowsiness detection system that will detect if the eyes of the driver are close for too long and infer if the driver is sleepy or inactive.
This can be an important safety implementation as studies suggest that accidents due to drivers getting drowsy or sleepy account for around 20% of all accidents and on certain long journey roads it’s up to 50%. It is a serious issue and most people that have driven for long hours at night can relate to the fact that fatigue and slight brief state of unconsciousness can happen to anyone and everyone.
There has been an increase in safety systems in cars & other vehicles and many are now mandatory in vehicles, but all of them cannot help if a driver falls asleep behind the wheel even for a brief moment. Hence that is what we are gonna build today – Driver Drowsiness Detection System
The libraries need for driver drowsiness detection system are
- Opencv
- Dlib
- Numpy
These are the only packages you will need for this machine learning project.
OpenCV and NumPy installation is using pip install and dlib installation using pip only works if you have cmake and vs build tools 2015 or later (if on python version>=3.7) The easiest way is to create a python 3.6 env in anaconda and install a dlib wheel supported for python 3.6.
Import the libraries
Numpy is used for handling the data from dlib and mathematical functions. Opencv will help us in gathering the frames from the webcam and writing over them and also displaying the resultant frames.
Dlib to extract features from the face and predict the landmark using its pre-trained face landmark detector.
Dlib is an open source toolkit written in c++ that has a variety of machine learning models implemented and optimized. Preference is given to dlib over other libraries and training your own model because it is fairly accurate, fast, well documented, and available for academic, research, and even commercial use.
Dlib’s accuracy and speed are comparable with the most state-of-the-art neural networks, and because the scope of this project is not to train one, we’ll be using dlib python wrapper Pretrained facial landmark model is available with the code, you can download it from there.
The hypot function from the math library calculates the hypotenuse of a right-angle triangle or the distance between two points (euclidean norm).
import numpy as np
import dlib
import cv2
from math import hypot
Here we prepare our capture call to OpenCV’s video capture method that will capture the frames from the webcam in an infinite loop till we break it and stop the capture.
cap = cv2.VideoCapture(0)
Dlib’s face and facial landmark predictors
Keep the downloaded landmark detection .dat file in the same folder as this code file or provide a complete path in the dlib.shape_predictor function.
This will prepare the predictor for further prediction.
detector = dlib.get_frontal_face_detector()
predictor = dlib.shape_predictor("shape_predictor_68_face_landmarks.dat")
We create a function to calculate the midpoint from two given points.
As we are gonna use this more than once in a call we create a separate function for this.
def mid(p1 ,p2):
    return int((p1.x + p2.x)/2), int((p1.y + p2.y)/2)
Create a function for calculating the blinking ratio
Create a function for calculating the blinking ratio or the eye aspect ratio of the eyes. There are six landmarks for representing each eye.
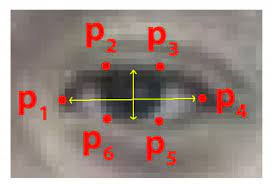
Starting from the left corner moving clockwise. We find the ratio of height and width of the eye to infer the open or close state of the eye.blink-ratio=(|p2-p6|+|p3-p5|)(2|p1-p4|). The ratio falls to approximately zero when the eye is close but remains constant when they are open.
def eye_aspect_ratio(eye_landmark, face_roi_landmark):
    left_point = (face_roi_landmark.part(eye_landmark[0]).x, face_roi_landmark.part(eye_landmark[0]).y)
    right_point = (face_roi_landmark.part(eye_landmark[3]).x, face_roi_landmark.part(eye_landmark[3]).y)
    center_top = mid(face_roi_landmark.part(eye_landmark[1]), face_roi_landmark.part(eye_landmark[2]))
    center_bottom = mid(face_roi_landmark.part(eye_landmark[5]), face_roi_landmark.part(eye_landmark[4]))
    hor_line_length = hypot((left_point[0] - right_point[0]), (left_point[1] - right_point[1]))
    ver_line_length = hypot((center_top[0] - center_bottom[0]), (center_top[1] - center_bottom[1]))
    ratio = hor_line_length / ver_line_length
    return ratio
Create a function for calculating mouth aspect ratio
Similarly, we define the mouth ratio function for finding out if a person is yawning or not. This function gives the ratio of height to width of mouth. If height is more than width it means that the mouth is wide open.
For this as well we use a series of points from the dlib detector to find the ratio.
def mouth_aspect_ratio(lips_landmark, face_roi_landmark):
    left_point = (face_roi_landmark.part(lips_landmark[0]).x, face_roi_landmark.part(lips_landmark[0]).y)
    right_point = (face_roi_landmark.part(lips_landmark[2]).x, face_roi_landmark.part(lips_landmark[2]).y)
    center_top = (face_roi_landmark.part(lips_landmark[1]).x, face_roi_landmark.part(lips_landmark[1]).y)
    center_bottom = (face_roi_landmark.part(lips_landmark[3]).x, face_roi_landmark.part(lips_landmark[3]).y)
    hor_line_length = hypot((left_point[0] - right_point[0]), (left_point[1] - right_point[1]))
    ver_line_length = hypot((center_top[0] - center_bottom[0]), (center_top[1] - center_bottom[1]))
    if hor_line_length == 0:
        return ver_line_length
    ratio = ver_line_length / hor_line_length
    return ratio
We create a counter variable to count the number of frames the eye has been close for or the person is yawning and later use to define drowsiness in driver drowsiness detection system project Also, we declare the font for writing on images with opencv.
count = 0
font = cv2.FONT_HERSHEY_TRIPLEX
Begin processing of frames
Creating an infinite loop we receive frames from the opencv capture method.
We flip the frame because mirror image and convert it to grayscale. Then pass it to the face detector.
while True:
    _, img = cap.read()
    img = cv2.flip(img,1)
    gray = cv2.cvtColor(img, cv2.COLOR_BGR2GRAY)
    faces = detector(gray)
We loop if there are more than one face in the frame and calculate for all faces. Passing the face to the landmark predictor we get the facial landmarks for further analysis.
Passing the points of each eye to the compute_blinking_ratio function we calculate the ratio for both the eyes and then take the mean of it.
  for face_roi in faces:
        landmark_list = predictor(gray, face_roi)
        left_eye_ratio = eye_aspect_ratio([36, 37, 38, 39, 40, 41], landmark_list)
        right_eye_ratio = eye_aspect_ratio([42, 43, 44, 45, 46, 47], landmark_list)
        eye_open_ratio = (left_eye_ratio + right_eye_ratio) / 2
        cv2.putText(img, str(eye_open_ratio), (0, 13), font, 0.5, (100, 100, 100))
        ###print(left_eye_ratio,right_eye_ratio,eye_open_ratio)
        #Similarly we calculate the ratio for the mouth to get yawning status, for both outer and inner lips to be more accurate and calculate its mean.
        inner_lip_ratio = mouth_aspect_ratio([60,62,64,66], landmark_list)
        outter_lip_ratio = mouth_aspect_ratio([48,51,54,57], landmark_list)
        mouth_open_ratio = (inner_lip_ratio + outter_lip_ratio) / 2;
        cv2.putText(img, str(mouth_open_ratio), (448, 13), font, 0.5, (100, 100, 100))
        ###print(inner_lip_ratio,outter_lip_ratio,mouth_open_ratio)
Now that we have our data we check if the mouth is wide open and the eyes are not closed. If we find that either of these situations occurs we increment the counter variable counting the number of frames the situation is persisting.
We also find the coordinates for the face bounding box
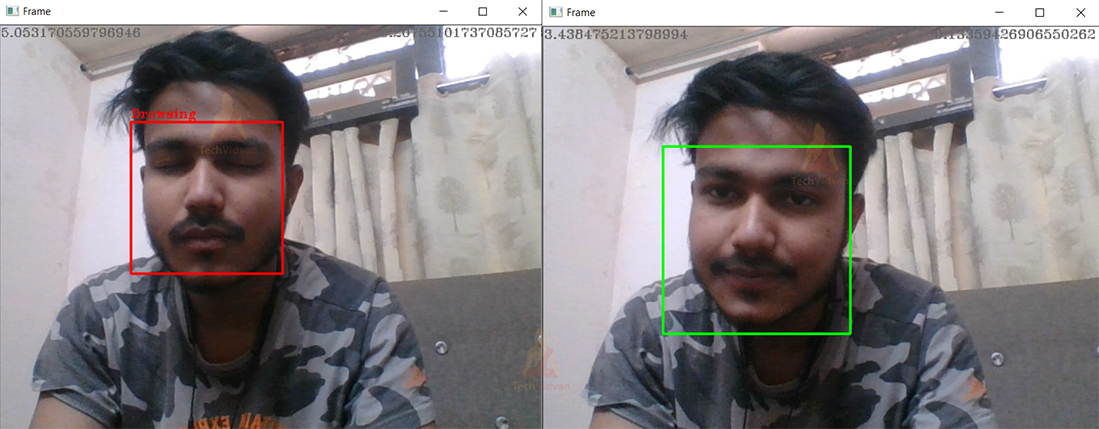
If the eyes are close or yawning occurs for more than 10 consecutive frames we infer the driver as drowsy and print that on the image as well as creating the bounding box red, else just create a green bounding box ``python if mouth_open_ratio > 0.380 and eye_open_ratio > 4.0 or eye_open_ratio > 4.30: count +=1 else: count = 0 x,y = face_roi.left(), face_roi.top() x1,y1 = face_roi.right(), face_roi.bottom() if count>10: cv2.rectangle(img, (x,y), (x1,y1), (0, 0, 255), 2) cv2.putText(img, "Sleepy", (x, y-5), font, 0.5, (0, 0, 255))
else: cv2.rectangle(img, (x,y), (x1,y1), (0, 255, 0), 2) `` Finally, we show the frame and wait for the esc keypress to exit the infinite loop.
After we exit the loop we release the webcam capture and close all the windows and exit the program.
Driver Drowsiness Detection Output
Summary
we have successfully created driver drowsiness detector, we can implement it in other projects like computer vision, self-driving cars, drive safety, etc.
Driver drowsiness project can be used with a raspberry pie to create a standalone system for drivers, used as a web service, or installed in workplaces to monitor employees’ activity. The sensitivity and the number of frames can be changed according to the requirements.
Made with

 41 Dec 27, 2022
 544 Dec 20, 2022
 309 Dec 06, 2022
 38 Dec 05, 2022
 1.2k Dec 29, 2022
 13 Mar 31, 2022
 790 Jan 05, 2023
 3 Jul 13, 2022
 67 Dec 29, 2022
 1 Jan 13, 2022
 260 Jan 03, 2023
 21 Mar 11, 2022
 84 Jan 05, 2022
 107 Jan 09, 2023
 1.1k Jan 02, 2023
 7 Oct 03, 2022
 562 Jan 03, 2023
 71 Dec 30, 2022
 1 Jan 26, 2022
 20 Oct 25, 2022