
Augmentor is an image augmentation library in Python for machine learning. It aims to be a standalone library that is platform and framework independent, which is more convenient, allows for finer grained control over augmentation, and implements the most real-world relevant augmentation techniques. It employs a stochastic approach using building blocks that allow for operations to be pieced together in a pipeline.


Installation
Augmentor is written in Python. A Julia version of the package is also being developed as a sister project and is available here.
Install using pip from the command line:
pip install Augmentor
See the documentation for building from source. To upgrade from a previous version, use pip install Augmentor --upgrade.
Documentation
Complete documentation can be found on Read the Docs: http://augmentor.readthedocs.io/
Quick Start Guide and Usage
The purpose of Augmentor is to automate image augmentation (artificial data generation) in order to expand datasets as input for machine learning algorithms, especially neural networks and deep learning.
The package works by building an augmentation pipeline where you define a series of operations to perform on a set of images. Operations, such as rotations or transforms, are added one by one to create an augmentation pipeline: when complete, the pipeline can be executed and an augmented dataset is created.
To begin, instantiate a Pipeline object that points to a directory on your file system:
import Augmentor
p = Augmentor.Pipeline("/path/to/images")
You can then add operations to the Pipeline object p as follows:
p.rotate(probability=0.7, max_left_rotation=10, max_right_rotation=10)
p.zoom(probability=0.5, min_factor=1.1, max_factor=1.5)
Every function requires you to specify a probability, which is used to decide if an operation is applied to an image as it is passed through the augmentation pipeline.
Once you have created a pipeline, you can sample from it like so:
p.sample(10000)
which will generate 10,000 augmented images based on your specifications. By default these will be written to the disk in a directory named output relative to the path specified when initialising the p pipeline object above.
If you wish to process each image in the pipeline exactly once, use process():
p.process()
This function might be useful for resizing a dataset for example. It would make sense to create a pipeline where all of its operations have their probability set to 1 when using the process() method.
Multi-threading
Augmentor (version >=0.2.1) now uses multi-threading to increase the speed of generating images.
This may slow down some pipelines if the original images are very small. Set multi_threaded to False if slowdown is experienced:
p.sample(100, multi_threaded=False)
However, by default the sample() function uses multi-threading. This is currently only implemented when saving to disk. Generators will use multi-threading in the next version update.
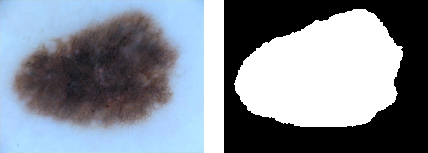
Ground Truth Data
Images can be passed through the pipeline in groups of two or more so that ground truth data can be identically augmented.
| Original image and mask[3] | Augmented original and mask images |
|---|---|
 |
 |
To augment ground truth data in parallel to any original data, add a ground truth directory to a pipeline using the ground_truth() function:
p = Augmentor.Pipeline("/path/to/images")
# Point to a directory containing ground truth data.
# Images with the same file names will be added as ground truth data
# and augmented in parallel to the original data.
p.ground_truth("/path/to/ground_truth_images")
# Add operations to the pipeline as normal:
p.rotate(probability=1, max_left_rotation=5, max_right_rotation=5)
p.flip_left_right(probability=0.5)
p.zoom_random(probability=0.5, percentage_area=0.8)
p.flip_top_bottom(probability=0.5)
p.sample(50)
Multiple Mask/Image Augmentation
Using the DataPipeline class (Augmentor version >= 0.2.3), images that have multiple associated masks can be augmented:
| Multiple Mask Augmentation |
|---|
 |
Arbitrarily long lists of images can be passed through the pipeline in groups and augmented identically using the DataPipeline class. This is useful for ground truth images that have several masks, for example.
In the example below, the images and their masks are contained in the images data structure (as lists of lists), while their labels are contained in y:
p = Augmentor.DataPipeline(images, y)
p.rotate(1, max_left_rotation=5, max_right_rotation=5)
p.flip_top_bottom(0.5)
p.zoom_random(1, percentage_area=0.5)

augmented_images, labels = p.sample(100)
The DataPipeline returns images directly (augmented_images above), and does not save them to disk, nor does it read data from the disk. Images are passed directly to DataPipeline during initialisation.
For details of the images data structure and how to create it, see the Multiple-Mask-Augmentation.ipynb Jupyter notebook.
Generators for Keras and PyTorch
If you do not wish to save to disk, you can use a generator (in this case with Keras):
g = p.keras_generator(batch_size=128)
images, labels = next(g)
which returns a batch of images of size 128 and their corresponding labels. Generators return data indefinitely, and can be used to train neural networks with augmented data on the fly.
Alternatively, you can integrate it with PyTorch:
import torchvision
transforms = torchvision.transforms.Compose([
    p.torch_transform(),
    torchvision.transforms.ToTensor(),
])
Main Features
Elastic Distortions
Using elastic distortions, one image can be used to generate many images that are real-world feasible and label preserving:
| Input Image | Augmented Images | |
|---|---|---|
 |
→ |  |
The input image has a 1 pixel black border to emphasise that you are getting distortions without changing the size or aspect ratio of the original image, and without any black/transparent padding around the newly generated images.
The functionality can be more clearly seen here:
| Original Image[1] | Random distortions applied |
|---|---|
 |
 |
Perspective Transforms
There are a total of 12 different types of perspective transform available. Four of the most common are shown below.
| Tilt Left | Tilt Right | Tilt Forward | Tilt Backward |
|---|---|---|---|
 |
 |
 |
 |
The remaining eight types of transform are as follows:
| Skew Type 0 | Skew Type 1 | Skew Type 2 | Skew Type 3 |
|---|---|---|---|
 |
 |
 |
 |
| Skew Type 4 | Skew Type 5 | Skew Type 6 | Skew Type 7 |
|---|---|---|---|
 |
 |
 |
 |
Size Preserving Rotations
Rotations by default preserve the file size of the original images:
| Original Image | Rotated 10 degrees, automatically cropped |
|---|---|
|
 |
Compared to rotations by other software:
| Original Image | Rotated 10 degrees |
|---|---|
|
 |
Size Preserving Shearing
Shearing will also automatically crop the correct area from the sheared image, so that you have an image with no black space or padding.
| Original image | Shear (x-axis) 20 degrees | Shear (y-axis) 20 degrees |
|---|---|---|
|
 |
 |
Compare this to how this is normally done:
| Original image | Shear (x-axis) 20 degrees | Shear (y-axis) 20 degrees |
|---|---|---|
|
 |
 |
Cropping
Cropping can also be handled in a manner more suitable for machine learning image augmentation:
| Original image | Random crops + resize operation |
|---|---|
|
 |
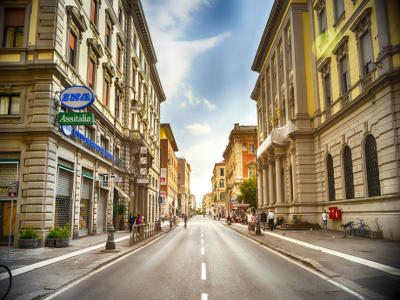
Random Erasing
Random Erasing is a technique used to make models robust to occlusion. This may be useful for training neural networks used in object detection in navigation scenarios, for example.
| Original image[2] | Random Erasing |
|---|---|
 |
 |
See the Pipeline.random_erasing() documentation for usage.
Chaining Operations in a Pipeline
With only a few operations, a single image can be augmented to produce large numbers of new, label-preserving samples:
| Original image | Distortions + mirroring |
|---|---|
 |
 |
In the example above, we have applied three operations: first we randomly distort the image, then we flip it horizontally with a probability of 0.5 and then vertically with a probability of 0.5. We then sample from this pipeline 100 times to create 100 new data.
p.random_distortion(probability=1, grid_width=4, grid_height=4, magnitude=8)
p.flip_left_right(probability=0.5)
p.flip_top_bottom(probability=0.5)
p.sample(100)
Tutorial Notebooks
Integration with Keras using Generators
Augmentor can be used as a replacement for Keras' augmentation functionality. Augmentor can create a generator which produces augmented data indefinitely, according to the pipeline you have defined. See the following notebooks for details:
- Reading images from a local directory, augmenting them at run-time, and using a generator to pass the augmented stream of images to a Keras convolutional neural network, see
Augmentor_Keras.ipynb - Augmenting data in-memory (in array format) and using a generator to pass these new images to the Keras neural network, see
Augmentor_Keras_Array_Data.ipynb
Per-Class Augmentation Strategies
Augmentor allows for pipelines to be defined per class. That is, you can define different augmentation strategies on a class-by-class basis for a given classification problem.
See an example of this in the following Jupyter notebook: Per_Class_Augmentation_Strategy.ipynb
Complete Example
Let's perform an augmentation task on a single image, demonstrating the pipeline and several features of Augmentor.
First import the package and initialise a Pipeline object by pointing it to a directory containing your images:
import Augmentor

p = Augmentor.Pipeline("/home/user/augmentor_data_tests")
Now you can begin adding operations to the pipeline object:
p.rotate90(probability=0.5)
p.rotate270(probability=0.5)
p.flip_left_right(probability=0.8)
p.flip_top_bottom(probability=0.3)
p.crop_random(probability=1, percentage_area=0.5)
p.resize(probability=1.0, width=120, height=120)
Once you have added the operations you require, you can sample images from this pipeline:
p.sample(100)
Some sample output:
| Input Image[3] | Augmented Images | |
|---|---|---|
 |
→ |  |
The augmented images may be useful for a boundary detection task, for example.
Licence and Acknowledgements
Augmentor is made available under the terms of the MIT Licence. See Licence.md.
[1] Checkerboard image obtained from Wikimedia Commons and is in the public domain: https://commons.wikimedia.org/wiki/File:Checkerboard_pattern.svg
[2] Street view image is in the public domain: http://stokpic.com/project/italian-city-street-with-shoppers/
[3] Skin lesion image obtained from the ISIC Archive:
- Image id = 5436e3abbae478396759f0cf
- Download: https://isic-archive.com:443/api/v1/image/5436e3abbae478396759f0cf/download
You can use urllib to obtain the skin lesion image in order to reproduce the augmented images above:
>>> from urllib import urlretrieve
>>> im_url = "https://isic-archive.com:443/api/v1/image/5436e3abbae478396759f0cf/download"
>>> urlretrieve(im_url, "ISIC_0000000.jpg")
('ISIC_0000000.jpg', <httplib.HTTPMessage instance at 0x7f7bd949a950>)
Note: For Python 3, use from urllib.request import urlretrieve.
Logo created at LogoMakr.com
Tests
To run the automated tests, clone the repository and run:
$ py.test -v
from the command line. To view the CI tests that are run after each commit, see https://travis-ci.org/mdbloice/Augmentor.
Citing Augmentor
If you find this package useful and wish to cite it, you can use
Marcus D Bloice, Peter M Roth, Andreas Holzinger, Biomedical image augmentation using Augmentor, Bioinformatics, https://doi.org/10.1093/bioinformatics/btz259
Asciicast
Click the preview below to view a video demonstration of Augmentor in use:


 59 Nov 28, 2022
 93 Dec 19, 2022
 313 Oct 18, 2022
 3 Nov 06, 2021
 785 Dec 30, 2022
 43 Dec 12, 2022
 55 Dec 18, 2022
 0 Feb 02, 2022
 24 Nov 03, 2022
 7 Dec 25, 2022
 36 Oct 12, 2022
 2 Apr 28, 2022
 118 Dec 28, 2022
 369 Jan 04, 2023
 6 Dec 05, 2022
 71 Dec 28, 2022
 2 Jun 18, 2022
 27 Dec 30, 2022
 1 Feb 01, 2022
 958 Jan 03, 2023